
Rustic Italian Crusty Bread Recipe Video
This post may contain affiliate links. Read our disclosure policy.
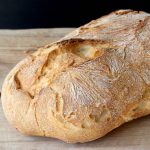
Easy and quick artisan Italian rustic crusty bread at home, no knead, no machine, no dutch oven, with only 2 hour rise time. Made by hand with active dry instant yeast, flour and water then baked on a hot pizza stone.

Artisan Italian Crusty Bread Recipe
I made us the perfect bread for soups, stews, bruschetta and to use for sandwiches / panini all week long.
A spin on my Italian pizza dough recipe, except here i use warm water to make the bread. Just mix together flour, salt and instant yeast then let rise for 2 hours. Only 2 hours for perfect homemade bread you guys!
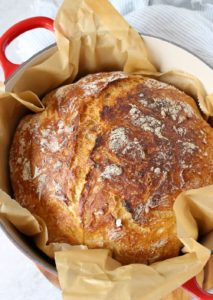
Then you bake it on a preheated pizza stone (<–amazon), for a peasant style loaf that crackles in your hands like a dream, yet still soft on the inside. Perfect for dipping or to dunk into a hot bowl of vegetable soup.

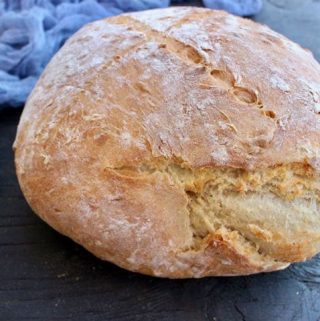
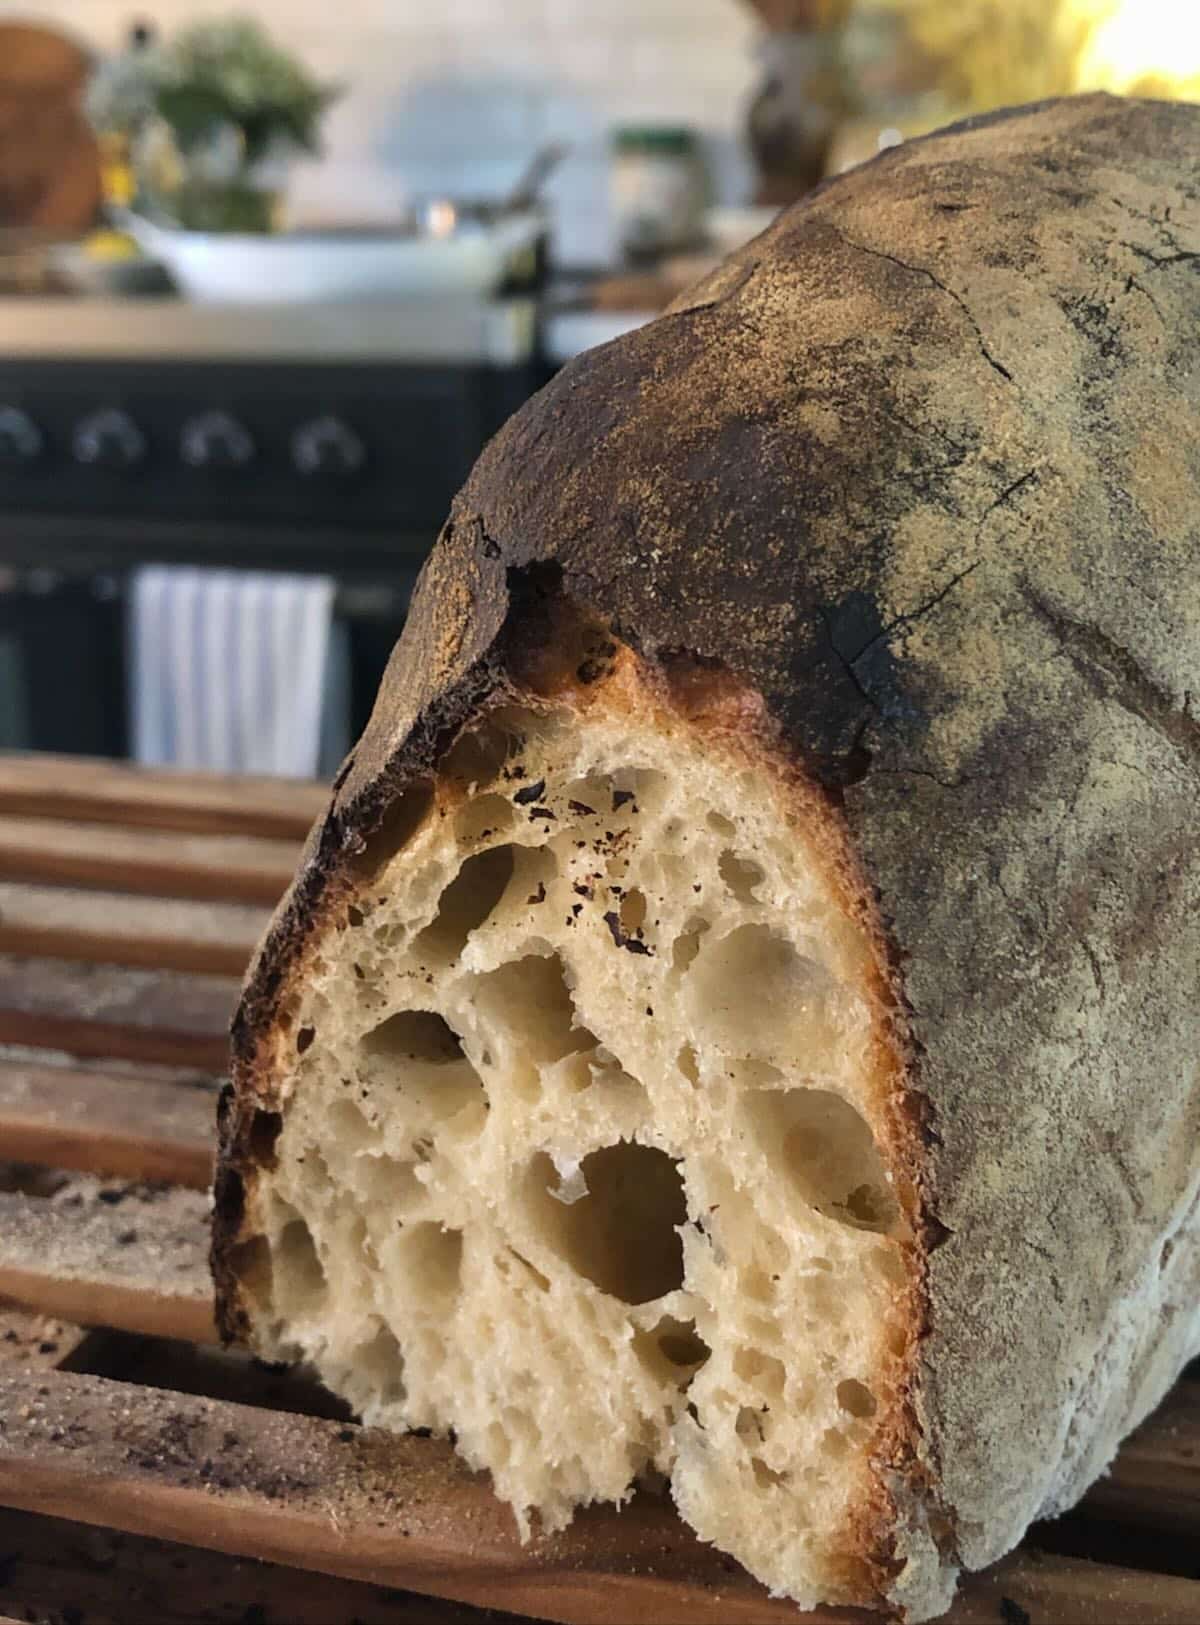
- A good homemade bread will have a soft, fluffy center with big holes and a crust that crackles in your hand with even a gentle squeeze. It’s very important to not overwork the dough if you are looking for airy holes in your bread like the ones in the photo above.
- Avoid the temptation to add more flour, simply dump the dough out of the bowl you mixed it in and shape into a loaf. No Kneading Allowed!
- I swear there’s nothing like the magic of a pizza stone, however you could also bake it inside a cast iron skillet or dutch oven if you really wanted to.

How to Serve and Eat Crusty Bread
- dip in olive oil with red chili flakes and fresh herbs.
- alongside Pasta e Ceci, Zuppa Toscana, Roasted Pepper Tomato Soup + Frutti di Mare.
- make the ultimate Tomato Bruschetta!
- enjoy with Oven Roasted Tomatoes + vegan mozzarella.
- tear a crusty corner like nobody’s watching while still a little warm and spread a little butter on it.
- add 2 tablespoons of rosemary to the dough, 1/3 cup of sliced black olives or sprinkle the top with poppy seeds before baking.

What makes the bread crusty?
The secret is a bowl of water steaming under the pizza stone while the bread is baking. The steam makes a crusty loaf!
How to Store
Allow the loaf to cool off completely on a cooling rack on its side. Place it in a plastic bag and store on the kitchen counter at room temperature for a couple of days. I would not recommend freezing this kind of bread, instead if you find yourself with a stale chunk simply do as the Italian do: make a big pot of Ribollita or this Tuscan Pappa al Pomodoro soup.

Rustic Crusty Italian Bread Recipe Video
Rustic Italian Crusty Bread Recipe
Ingredients
- 3.25 cups all purpose flour + more for dusting
- 1 tsp sea salt
- 1.5 cups warm water
- 2 tsp instant yeast (or active dry yeast)
Instructions
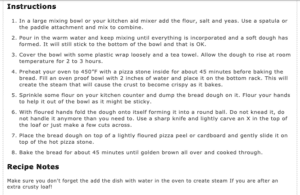
- In a large mixing bowl or your kitchen aid mixer add the flour, salt and yeast. Use a spatula or the paddle attachment and mix to combine well.3.25 cups all purpose flour, 2 tsp instant yeast, 1 tsp sea salt
- Pour in the warm water and keep mixing until everything is incorporated and a soft dough has formed. It will still stick to the bottom of the bowl and that is OK.1.5 cups warm water
- Cover the bowl with some plastic wrap loosely and a tea towel. Allow the dough to rise at room temperature for 2 to 3 hours until doubled in size.
- Sprinkle some flour on your kitchen counter and dump the bread dough on it. Flour your hands to help it out of the bowl as it will be sticky. Don't panic, this is normal.
- With floured hands fold the dough onto itself forming it into a round ball. Do not knead it, do not handle it anymore than you need to. Use a sharp knife and lightly carve an X in the top of the loaf or just make a few cuts across.
- Place the bread dough on top of a lightly floured pizza peel, cardboard or parchment paper and allow it to rest while your oven is heating up.
- Preheat your oven to 450”F with a pizza stone inside for about 45 minutes before baking the bread. Fill an oven proof bowl with 2 inches of water and place it on the bottom rack. This will create the steam that will cause the crust to become crispy as it bakes.
- Once your oven is hot sprinkle the pizza stone with some semolina flour or corn meal and carefully slide the bread loaf on top. Bake the bread for about 30 to 45 minutes until golden brown all over and cooked through.
- Transfer the bread to a cooling rack and allow to cool off completely before slicing into it. You can also let it cool inside the oven with the door slightly open.
Dutch Oven Method
- Instead of a pizza stone preheat your oven with a dutch oven inside. Once hot, carefully place the bread loaf inside the dutch oven ideally using parchment paper for easy transfer. Cover with the lid and bake for 30 minutes. Remove lid and bake another 5 minutes until golden brown on top. Remove the bread from the dutch oven and transfer to a cooling rack or it won't stay crispy.
Original Large Loaf Recipe:
- Ingredients: 1 package instant dry yeast (1/4 oz)6.25 cups all purpose flour + more for dusting2 tsp sea salt3 cups warm water.
- Instructions: Follow the above instructions and bake at 450"F for 45 minutes.
Video
Notes
- Adaptation Jan. 2021 - because some people were having trouble working with a large loaf, I adapted the recipe to make a smaller loaf that is easier to handle and that will cook evenly even without a pizza stone. Those of you more experienced bakers with a pizza stone or a bread/ pizza oven feel free to double the recipe and make a huge rustic loaf out of this.
- Water dish - make sure you don't forget to add the dish with water in the oven to create steam If you are after an extra crusty loaf!
- Parchment paper - If using parchment paper make sure to check the box for the max temperature it can safely be used in.
- Keep it Crusty - make sure to allow your loaf to cool off completely on a high cooling rack so the moisture can escape through the bottom while the crust stays crispy. Alternatively allow the loaf to cool off on a rack inside the oven with door slightly open. (remove from dutch oven and discard parchment paper first).
Nutrition
You’ll Also Love:


This was fantastic!
I love the bread!! Mine just came out a little too doughy. Any suggestions?
Hi Ali, I suspect the pizza stone and the oven didn’t heat up enough. I get the best result when I preheat them for at least 45 minutes, sometimes 1+ hours.
Hi Florentina,
I just made this bread it was awesome and even my very picky son loved it. Just one thing though, I used part whole wheat flour and all purpose flour. Would that be why my bread was so dense?
Yes, most definitely when you mix a whole wheat grain you’ll end up with a dense bread every time. Also, try not to overwork the dough 🙂
Hi Florentina!
made this bread the other night and it turned out just beautifully! I was curious if I wanted to cut the dough into smaller pieces (say 5oz) to make smaller buns, should I give the dough a 2nd rise in the smaller form before baking for obviously less time? I do love the simplicity of the 2 hour rise to bake but buns are sometimes just so handy too! Gotta say I love the sounds of that crust crackle when it comes out of the oven!
Hi Sarah, the process is the same, shape it the way you like from the very start 🙂
Wow, what a lovely dough.
It was so soft. I used floured hands. The bread came out beautiful!
You need to allow us to post pictures of how good this recipe came out.
Thank you. I am looking forward to trying your ciabatta recipe!
5 ⭐️ ⭐️ ⭐️ ⭐️ ⭐️ !
Thank you!!!
Sorry, I meant 5oz buns.. I would like to know the baking time. Thanks!
I am not sure if someone already asked, but have you ever tried this with whole wheat or multigrain flour?
Hi Sharon, I tried it with a mix of whole wheat pastry flour and all purpose flour. It turned out great too 🙂
Made your Rustic Pizza Dough yesterday using our new Kitchenaid….Loved It! Why don’t you use bread flour in Rustic Italian Bread recipe? May make bread today’s!
Can’t find good pizza dough or Italian bread here in North Georgia.
Thanks again!
Joe
You can use bread flour too, most people always have all-purpose flour on hand so to make it easier for everyone to whip this up I say all-purpose 🙂
Omg thank you!! This was so easy, and so amazing! I just made my first loaf and the satisfaction and pride I feel is hard to describe.
So happy to hear Anna, I know the feeling, I still get excited every time I bake it! haha
HELP! I baked two loaves today and they looked beautiful on the outside but the inside is still underdone ( a little doughy). I baked them in a dutch covered oven at 500 degrees for 30 minutes with the lid on and an additional 10 minutes without the lid.
Sorry about your trouble Dorrina.The recipe calls for a preheated oven at 450″F with a pizza stone inside. However, you can use the dutch oven method but that also has to be preheated with the oven. Did you preheat it, or was did you use a cold pot ? That will make all the difference for your bread. You can of course cooking longer If staring with a cold dutch oven. Wish I could have been more help. Have a happy holiday! ~ Florentina
I am on my 8th batch! My family and friends thank you, This recipe is perfect just the way it is.. I thank you 10 stars.and then another ten.
Wowza! You made my day, so happy to hear, we love this bread so much, easiest recipe of all times Xo’s
This looks wonderful. One day I’ll try it.
By chance you have a recipe for an Italian loaf? I want to make homemade bread to go with my homemade lasagna next week. Yes, I made homemade pasta sheets.
Thank you.
Michael Fedele from Florida
This is an Italian loaf made with pizza dough, literally easiest bread ever! There’s a Ciabatta recipe on here as well If you wanted to try that one, more time consuming tough: https://46favorites-holiday.com/ciabatta-bread-recipe/%3C/a%3E%3C/p%3E
Carisssima Florentina, I made the bread and it is amazing except the center is still a little doughy…. Help me !!!! this bread is just too good not to make it again…. Thank you,
Sal
Sal, are you sure your oven was very hot to begin with ? Or that the temperature is accurate ? Your oven might be a little off in which case you’d have to bake the bread longer, I would just test as you go and let that crust get golden brown before taking it out. I hope that will solve the problem, also make sure to use a heated pizza stone or a cast iron skillet that has been heated with the oven. Let me know how it goes next time! ~ Florentina 🙂
Holy cow! This bread was so easy to make and so delicious! My family LOVED it. Thank you for sharing this recipe!
Can this dough be cooked in a preheated dutch oven with the lid on? Ive been using that method for other breads. Or can i still use the dutch oven with the lid off and the bowl of water in the bottom of the oven?
yes you can!
Cover on?. How will the stream from the water help it crisp up if I did that?
Thanks
If you cover it you don’t need to worry about the water dish, steam would naturally form.
Hi…your yummy bread is baking in the oven as we speak! It looks so awesome! One question though…you wrote 45 minutes in the oven in the recipe, but the time in the beginning says 35 minutes cooking time. Which is correct? Thanks!
Hi Ingrid, it seems there was a glitch in the recipe plugin. So the bread needs about 40 to 45 minutes in the oven being that your oven has preheated well with a pizza stone or cast iron skillet inside. I hope that helps, sorry I caught your comment kind of late.
What is a substitute for a pizza stone? I dont have one and dont want to buy one either. thanks.
Try a cast iron skillet upside down preheated with the oven. Remember to sprinkle some cornmeal of flour on top before sliding the pizza in. Report back 🙂
no cast iron skillet either! 🙁
I dont have a cast iron skillet either 🙁
Can you get one ..?!
I’ve made this recipe successfully several times using a regular old baking pan or cookie sheet. Don’t know if it altered it but everyone loved my bread. Good luck!
Try turning a cookie sheet upside down. That acts like a pizza stone sort of. Also use the pan with water on the lower rack to create the steam needed for a crispy crust.
I just watched your video and I often make bread but it just didn’t look like 6 1/4 cups of flour not did it look like 3 cups of water.. Is the recipe halved in the video?
I would love to try this recipe,
The recipe is correct Sonja. Enjoy!
Does this recipe make 2 loaves? It seems like a large amount of flour. Also, if I wanted to cut the recipe in half, what would the measurement be for the yeast? Can’t wait to try it!
It only makes 1 loaf, I wouldn’t suggest cutting it in half, it is just an average size loaf.
I’ve made bread hundreds of times since I got married 40+ years ago, but I’ve NEVER made one as easy as this one.
It’s so delicious I’m sure I’ll be making it over & over again!
Thank you for sharing!
Woohoo! This is my go to bread recipe always!
Thank you for this life altering recipe. Since there are only two of us I have cut the recipe in half and it works perfect. I have made this bread three times adding garlic, Italian seasoning, cheese and sliced green olives. AWESOMELY delicious with what ever I add. Thank you soooo much for this recipe!!!
I’m never buying bread again. This loaf was perfect, I was worried at first because of the sticky dough but I just floured my hands well and followed the video steps. What can I tell you, we are if all the same day so off to make another. Thank you for another fantastic recipe!
Hi! Thank you for sharing this beautiful. I would like to Teh it but would you have the recipe in grams? I think cup measurement is very subjective and the result would probably be very different. 🙁 thanks!!
Hi Tammie, I always measure with the cups and the results will depend on the kind of flour I use. The same exact brand will take more or less water at different times. If you watch the video you’ll see the dough is wet and sticky when i dump it out of the bowl. I flour my hands very well and just help it along out of the bowl. Then I sprinkle a little more flour on top and shape the loaf without any kneading or handling it more than you must. Trust me, it will work out, you’ll need to learn how to feel it and you’ll be a pro after making it a couple of times.
Not a bread Baker in the past but my grandmother’s did so I said, “I’ll give it a rip!” WELL, four slices later..it’s fabulous!! Just exactly what I was hungering for. Thank you!
If I use a cast iron pan or dutch oven how long do I preheat it for?
Hi Lisa, I would preheat it with the oven for a good 30 minutes 🙂
I’ll be using my cast iron Dutch oven. Do I need to spray or grease it?
No need, you can place some parchment paper inside to make it even easier to remove the bread with it. Hope that makes sense 🙂
Being an Italian myself I make lots of homemade things but this was the first time making bread so thank you for sharing your Italian heritage and recipes! I ended up making two loaves instead of one ball loaf and they turned out delicious on my PC pizza stone. I was wondering if oils can be added to the dough for additional flavor? If yes how much? Thanks again, I’ll be trying more of your recipes!
So I followed directions to the letter. The bread was a beautiful work of art and tasted amazing (along with a good quality olive oil dip). The only issue I had was that the bread ended up more dense that I believe it was supposed to. While the crust was perfectly hardened, the center did end up being slightly under cooked. There was no kneeding and minimal handling. I want to try again and would also like to cut in half making 2 smaller loafs. Will this effect the amount of time, and how can I be sure it’s cooked thoroughly? Thank you!
Hi Florentina! I was so excited to try this recipe. The crackly crust and wonderful open holes in the bread really got me in the video! I made the bread today, but I don’t think it came out right. First of all…..the 3 cups of water made a dough that was not just soft, but it wouldn’t even come together and stay in a ball. I tried adding some more flour, but didn’t want to add too much and change the texture of the bread. It also didn’t help that my oven seemed to have an issue today, out of the blue, and wouldn’t move from the pre-heat setting! Anyway, the main question I have is about the amount of water called for. Should I just add the water a little at a time and not use the full 3 cups if the dough doesn’t need it?
Hi Joann, sorry for your troubles, ovens not working is so frustrating.
Okay, so that is the tricky part. No 2 flours will ever be exactly the same. I use an all purpose organic flour and usually it is pretty reliable with adding a little more or less flour every time. Feel free to add more flour as you see fit, or a little less water. Just make sure that the dough is still sticky. You don’t want a super dry loaf. Then when you dump it out of the bowl, again flour the surface and your hands/ fingers well. Sprinkle more flour on top and then fold the dough onto itself to form a loaf, as shown in the video below the recipe. It should be totally fine if you don’t overwork the dough.
Oven and stone must be HOT, HOT, we can’t make this without heat. Also, don’t forget the water dish for steam and crusty crust 😉
Thanks for responding to my comment so quickly! I’m hoping to try the recipe again soon, with your suggestions. This first attempt came out extremely heavy and didn’t have the nice holes in the loaf. Hopefully my next try will be successful!
You are welcome. Definitely report back when the oven is back up and running 🙂
Joann, I also had an impossible dough that wouldn’t come together. In the forming process I think I must’ve added nearly another whole cup of flour until I had something that would keep a shape. It’s in the oven now…
I know I’m a few years late, but this is why I advocate for weighing ingredients when baking and not using volume measurements such as cups. 6 cups of flour taken off the top of a fresh bag will weight a lot less than 6 cups taken of the bottom in the bag that has been settling for months. Also will depend on if people are packing flour into a cup or not. With an ingredient like flour, measurements should always be in weight because everyone will measure a cup of flour completely different.
is it okay to use a Pampered Chef stoneware large bar pan?
Sounds good, I’d give it a go. Make sure it is hot that’s all 🙂
Pampered Chef stones can’t be heated over 400’F, nor can they be preheated in the oven (I was a PC rep for 10 years). They are prone to shattering in the oven if you do either of those. Please look for a different type of stone that is oven safe at higher temperatures.
(I know I’m answering this question a few years after it was posted, but hoping this might help people who are just now stumbling across this recipe like I am)
I actually used my pampered chef stone and it was perfectly fine!
I also have a pampered Chef stone and it worked great at 450deg. My bread came out delicious.
Like Nelly, I used my Pampered Chef stone. Maybe just lucky, but I had no problem. Maybe it’s been “seasoned” enough as it’s about 15 years old. I’m about to heat it again for another loaf, so if it breaks, I’ll re-post. Otherwise, assume it went well.
Thank you that helped me!
I also cooked mine on a PC pizza stone. mines newer and I had just washed it, but while preheating it was smoking and set of my smoke detector. not sure what caused so much smoke while preheating
Linda the bar pan would be too large and could crack
Food has to be evenly Stripping it on the stoneware or it will crack
I used my PC stoneware pie plate and it worked prefect!
Thanks so much! My 11 year old daughter and I made this yesterday. It was the first time I’ve made bread, and it was easy and delicious!
awww isn’t bread making so much fun ?! So happy you enjoyed this experience with your daughter, absolutely precious ~Florentina Xo’s
Could you tell me the original measurements for this recipe ? Is it just double? Thanks.
Hey Paul, I just attached the original large loaf recipe and screenshots in the recipe card.
Florentina I made this crusty bread and it all was great except my bread was heavy and dense. What did I do wrong?
Hi Lesley, sounds like you maybe overworked a dough a bit when shaping it. If that happens just allow it to rise a little longer while your oven is preheating, you want it to bounce back after shaping it. Hope that helps with the next loaf ~ Florentina Xo’s
I found the same, are we supposed to let it prove a 2nd time? I handled mine less than shown in your video but it was very solid.
You’ll let your loaf rest while your oven is heating up with the pizza stone which should be 45 minutes, so it will continue to proof itself. What temperature is your home usually? If it’s winter and very cold inside it will take the bread longer to rise and double in size. You should see little bubbles all over the surface when it’s ready to be shaped. I’ve been baking this bread for many many years in hot climates so the process is always quick. If your home temperature is colder then place your bowl in a draft free area like a second oven that isn’t in use or a cupboard etc. I’ve just made a loaf and swapped 1/3 cup whole wheat pastry flour and it was as light as ever. Hope you nail it next time around, it’s really a great bread ~ Florentina Xo’s
Just made this bread and it came out awesome! I felt like i had just been served a bread at an Italian restaurant in the North End of Boston. My mix was slightly different as i had 3 cups of Caputo 00 flour leftover from some pizzas I made. So I just mixed the flour with 3.25 cups of King Arthur AP flour and it came out great. It was very “glutenny” and sticky, so I was afraid it would come out too dense, but it came out perfect. Went perfect with Tuscan Bean Soup my wife made that evening.