
Rustic Italian Crusty Bread Recipe Video
This post may contain affiliate links. Read our disclosure policy.
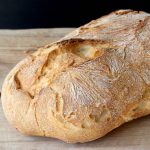
Easy and quick artisan Italian rustic crusty bread at home, no knead, no machine, no dutch oven, with only 2 hour rise time. Made by hand with active dry instant yeast, flour and water then baked on a hot pizza stone.

Artisan Italian Crusty Bread Recipe
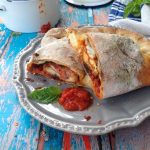
I made us the perfect bread for soups, stews, bruschetta and to use for sandwiches / panini all week long.
A spin on my Italian pizza dough recipe, except here i use warm water to make the bread. Just mix together flour, salt and instant yeast then let rise for 2 hours. Only 2 hours for perfect homemade bread you guys!
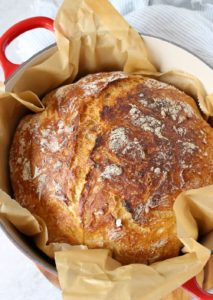
Then you bake it on a preheated pizza stone (<–amazon), for a peasant style loaf that crackles in your hands like a dream, yet still soft on the inside. Perfect for dipping or to dunk into a hot bowl of vegetable soup.

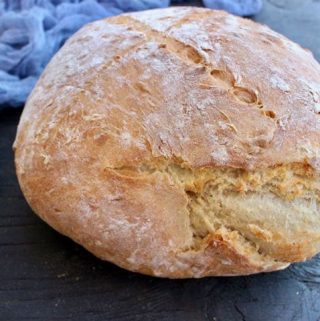
- A good homemade bread will have a soft, fluffy center with big holes and a crust that crackles in your hand with even a gentle squeeze. It’s very important to not overwork the dough if you are looking for airy holes in your bread like the ones in the photo above.
- Avoid the temptation to add more flour, simply dump the dough out of the bowl you mixed it in and shape into a loaf. No Kneading Allowed!
- I swear there’s nothing like the magic of a pizza stone, however you could also bake it inside a cast iron skillet or dutch oven if you really wanted to.

How to Serve and Eat Crusty Bread
- dip in olive oil with red chili flakes and fresh herbs.
- alongside Pasta e Ceci, Zuppa Toscana, Roasted Pepper Tomato Soup + Frutti di Mare.
- make the ultimate Tomato Bruschetta!
- enjoy with Oven Roasted Tomatoes + vegan mozzarella.
- tear a crusty corner like nobody’s watching while still a little warm and spread a little butter on it.
- add 2 tablespoons of rosemary to the dough, 1/3 cup of sliced black olives or sprinkle the top with poppy seeds before baking.

What makes the bread crusty?
The secret is a bowl of water steaming under the pizza stone while the bread is baking. The steam makes a crusty loaf!
How to Store
Allow the loaf to cool off completely on a cooling rack on its side. Place it in a plastic bag and store on the kitchen counter at room temperature for a couple of days. I would not recommend freezing this kind of bread, instead if you find yourself with a stale chunk simply do as the Italian do: make a big pot of Ribollita or this Tuscan Pappa al Pomodoro soup.

Rustic Crusty Italian Bread Recipe Video
Rustic Italian Crusty Bread Recipe
Ingredients
- 3.25 cups all purpose flour + more for dusting
- 1 tsp sea salt
- 1.5 cups warm water
- 2 tsp instant yeast (or active dry yeast)
Instructions
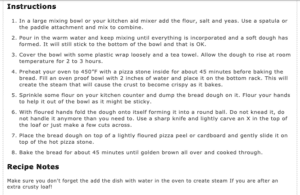
- In a large mixing bowl or your kitchen aid mixer add the flour, salt and yeast. Use a spatula or the paddle attachment and mix to combine well.3.25 cups all purpose flour, 2 tsp instant yeast, 1 tsp sea salt
- Pour in the warm water and keep mixing until everything is incorporated and a soft dough has formed. It will still stick to the bottom of the bowl and that is OK.1.5 cups warm water
- Cover the bowl with some plastic wrap loosely and a tea towel. Allow the dough to rise at room temperature for 2 to 3 hours until doubled in size.
- Sprinkle some flour on your kitchen counter and dump the bread dough on it. Flour your hands to help it out of the bowl as it will be sticky. Don't panic, this is normal.
- With floured hands fold the dough onto itself forming it into a round ball. Do not knead it, do not handle it anymore than you need to. Use a sharp knife and lightly carve an X in the top of the loaf or just make a few cuts across.
- Place the bread dough on top of a lightly floured pizza peel, cardboard or parchment paper and allow it to rest while your oven is heating up.
- Preheat your oven to 450”F with a pizza stone inside for about 45 minutes before baking the bread. Fill an oven proof bowl with 2 inches of water and place it on the bottom rack. This will create the steam that will cause the crust to become crispy as it bakes.
- Once your oven is hot sprinkle the pizza stone with some semolina flour or corn meal and carefully slide the bread loaf on top. Bake the bread for about 30 to 45 minutes until golden brown all over and cooked through.
- Transfer the bread to a cooling rack and allow to cool off completely before slicing into it. You can also let it cool inside the oven with the door slightly open.
Dutch Oven Method
- Instead of a pizza stone preheat your oven with a dutch oven inside. Once hot, carefully place the bread loaf inside the dutch oven ideally using parchment paper for easy transfer. Cover with the lid and bake for 30 minutes. Remove lid and bake another 5 minutes until golden brown on top. Remove the bread from the dutch oven and transfer to a cooling rack or it won't stay crispy.
Original Large Loaf Recipe:
- Ingredients: 1 package instant dry yeast (1/4 oz)6.25 cups all purpose flour + more for dusting2 tsp sea salt3 cups warm water.
- Instructions: Follow the above instructions and bake at 450"F for 45 minutes.
Video
Notes
- Adaptation Jan. 2021 - because some people were having trouble working with a large loaf, I adapted the recipe to make a smaller loaf that is easier to handle and that will cook evenly even without a pizza stone. Those of you more experienced bakers with a pizza stone or a bread/ pizza oven feel free to double the recipe and make a huge rustic loaf out of this.
- Water dish - make sure you don't forget to add the dish with water in the oven to create steam If you are after an extra crusty loaf!
- Parchment paper - If using parchment paper make sure to check the box for the max temperature it can safely be used in.
- Keep it Crusty - make sure to allow your loaf to cool off completely on a high cooling rack so the moisture can escape through the bottom while the crust stays crispy. Alternatively allow the loaf to cool off on a rack inside the oven with door slightly open. (remove from dutch oven and discard parchment paper first).
Nutrition
You’ll Also Love:


Excellent loaf of bread. Easy to make. Perfect crust. Thank you so much for posting this recipe.
Thank You for recipe.
My bread is soft and tasty but the crust is hard. I had to struggle to cut slices.
What did I do wrong?
Hey Swapna, sounds like too much steam escaped from the bread and the crust hardened too much. I’d recommend wrapping the loaf in a tea towel to help retain some of that moisture while the bread is cooling down next time.
We lived in Europe for many years and really miss the bread – I love this recipe as it is so easy to make and takes much less time than when I make other breads. It is very close to the breads I used to get at the bakeries!
One question – if I made the double recipe is it possible to freeze or refrigerate one of the loaves for later? (maybe parbake it?).
Thanks for sharing this recipe
Yes you can bake it all the way, cool down, freeze and then to reheat cook the loaf at 400″F 10 to 12 minutes.
Hi, I just made this bread and it came out good and very crusty. However, I did not get the holes inside the bread. I don’t know why. I couldn’t send a picture.
Hi Faith, you might have overworked the dough while you shaped the loaf. Make sure to allow it to rest after shaping while your oven is heating up.
Once the dough has risen and doubled, and the round ball has been formed, how long should the dough rest before baking? I am unclear whether the oven preheat is should be done while the dough is initially rising or after. Thanks – looking forward to making this recipe!
Once I form my bread loaf I preheat my oven with the pizza stone inside for a good 45 minutes while my loaf is resting in a draft free area during this time.
I just made this bread for the second time. The first time it turned out perfect but this time it didn’t rise as well. I used bread flour vs. all purpose…..do you think that made a difference?
Thanks!
Hey Christy, bread flour should work just fine here, I’m thinking the yeast might be the issue or the temperature in your home. If you are in a cold climate it might take longer to rise. It’s a good idea to store the dough in a shielded draft free spot and allow for a longer rise time, you can even prep the night before.
Hi there,
I always had good success with your old recipe. I just made bread again today by doubling this new recipe and it hasn’t come out quite right. Could you please repost the old recipe? I like making the larger loaves.
Thank you!
Holly
So sorry about that Holly, I updated the recipe card to include the original large loaf and the screenshots from before. Hope that helps 🙂 ~ Florentina
Thank you so much. I let the other loaf rise for about 3.5 hours and it came out perfect (as they all have). I’ve added rosemary, parmesan, nuts and fruit to this recipe and also made it in a dutch oven. Everyone loves it!
This makes me so happy Holly ~ Florentina Xo’s
Hi Florientia,
I’m so excited to find your food blog site. I’m especially excited to bake the Rustic bread. Question…at what point do you add the rosemary and olives?
Thanks for your help.
Quincie
Just add them in the beginning with the flour.
Thanks. I appreciate the recipe. It’s the first time that I’ve made bread, and It was delicious. I’m making the Italian wedding cookies and Macaroons today for Christmas gifts. I love your healthy recipes. TY Quincie
I made this beautiful bread for our Thanksgiving dinner. My husband loved it, I wish I could post a picture of it that’s how great it came out! Thank you so much for sharing.
Where should the rack be placed in the oven for the loaf ?
Middle rack!
Hi!
I made the loaf last night and it came out great! I wanted to make a baguette style bread. Can I use this recipe and shape the dough carefully dividing it in two?
Thanks!
Yes you can.
I’m going to try this on my new cast iron griddle in the oven, my husband put my pizza stone on the top shelf of an 8 foot shelf lol. I’ll let you know!
For that same reason I got a library ladder installed in my kitchen, this 5.3 woman has had enough lol. I’ll post the remodel photos on my VeggieSociety.com blog soon if you wanna see them 🙂
My family loves this bread! My husband is from Chicago, and we miss good bread here in southern Indiana. If I were to make 2 loaves, would I need to put 2 dishes of water in the bottom? Thanks!
Just one dish of water for the steam is fine or you could bake them inside cast iron dutch oven for the same effect.
I just made this today for the first time. I’ve read a lot of the comments and I know that I must have worked the bread a little too much. Lesson learned, but it is still so good! Husband had suggested spaghetti for dinner so there has to be bread!! I DID make a smaller loaf. I changed the measurements to serving for 4 and it turned out great. I also baked it on my Pampered Chef pizza stone that I have had since about 2005. Maybe the older ones were okay to heat that high, I’ve also used it while making French bread in a Dutch oven preheated to 500. No cracks. Can’t wait to make this again!
Made this for the 5th time in my Dutch Oven using parchment paper. I LOVE this recipe! Thank you 🙂
Very good bread! I can’t wait to try various toppings and add ins. I baked it on a cast iron skillet but put the water pan in at the pre heat so I do not think the skillet got quite hot enough, I will do that different next time. I had to pretty much pick the dough up and place it on the skillet, how do you get it to slide off of the pizza peel? Or would it work to just bake it on quillon parchment paper? Between this, fresh baked scali bread and a few others I may never buy bread again.
Thank you, Rick T
Yes just use parchment paper if that makes it easier, just make sure to check temperature on the box first.
This is not an average-sized loaf. 6.25 cups of flour makes a humongous loaf of bread. That amount of flour easily makes 3 average-sized Italian loaves. I kinda knew that when I started because that’s about the amount of flour used for bread dough in the basic recipe for “Artisan Bread in Five Minutes a Day”. Nevertheless, I followed the recipe and it does indeed make a decent loaf, without the overnight resting that 5 Minutes recommends. Because it makes such a big loaf, baking times need to be adjusted, or you get a well-baked loaf on the top but the bottom is dense and wet. I did use parchment paper to slide the mass onto the baking stone and probably should have removed it after about ten minutes, which may have contributed to the denseness on the bottom. I’ll use this recipe again but make adjustments to prevent back pain from maneuvering it.
I baked this bread in my Dutch oven that I oiled and coated the bottom with corn meal. This bread came out FANTASTIC!!!!! Absolutely will make this again and again and again!!! Thank you!!
This bread had a really lovely flavour.
I normally make a slow rise bread but I’ll definitely keep this in my recipe list for a quick bread.
Thank you for the recipe
Love this bread recipe….made it once and it was amazing, gave recipe to a friend,
she had great success too.
I just made it again, and I FORGOT to heat the cast iron pan before baking. Will this
be a disaster? I’m about to find out. I did heat up the bowl of water while heating
up the oven, but that was it!!!
Your instructions are perfect! I wish I paid attention to the recipe more 2nd time!!
Thank you for a great recipe!
For crusty bread, do you have to put a bowl of water underneath even if I use a dutch oven.
Not if you use a dutch oven.
Hi! I made bread with this recipe a couple days ago and it was super fun and easy but the bread was a little too dense. Is there anyway I can fix that?
Sounds like you probably overworked the dough while shaping the loaf. If you feel like you might have done that I suggest giving another 20 minutes or so after shaping to rise again before baking.
Ciao Fiorentina, just like 99.99% of the people who have commented. This recipe is incredible. I would like to perfect it though using the flour, yeast, etc. available to me,including my oven. MY oven has a proofing feature
That I decided to use. After about 80 minutes, it was up over the large Pyrex dish I had it in so I took it out, shaped it and put it in the other preheated oven with a pizza stone that already had the water container in it. After 25 Minutes the bread had risen beautifully but was very, very dark. I watched for a bit more, tapped on it…hollow sound, so I took it out, let it cool and it is beautiful, full of holes and crunchy. Have you ever had yours cook that quickly?
That sounds exciting Angela, I have not had mine cook that quick, sounds like you have an amazing oven, i need an upgrade haha
My bread also cooked in much less time. 30-35 minutes. It was perfect!
Hello! I read thru most of the comments and didn’t see this question- can I use a 1:1 gluten free flour to make this bread? I would love to make this recipe but can’t eat wheat. Thank you!
Sorry, I have not tested this with any gluten free flour, I really don’t think it would work that great to be honest.
Does the yeast need to be prepared or can it just go straight into the bowl?
straight into the bowl like the video shows 🙂