
Rustic Italian Crusty Bread Recipe Video
This post may contain affiliate links. Read our disclosure policy.
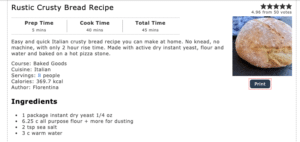
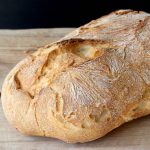
Easy and quick artisan Italian rustic crusty bread at home, no knead, no machine, no dutch oven, with only 2 hour rise time. Made by hand with active dry instant yeast, flour and water then baked on a hot pizza stone.

Artisan Italian Crusty Bread Recipe
I made us the perfect bread for soups, stews, bruschetta and to use for sandwiches / panini all week long.
A spin on my Italian pizza dough recipe, except here i use warm water to make the bread. Just mix together flour, salt and instant yeast then let rise for 2 hours. Only 2 hours for perfect homemade bread you guys!
Then you bake it on a preheated pizza stone (<–amazon), for a peasant style loaf that crackles in your hands like a dream, yet still soft on the inside. Perfect for dipping or to dunk into a hot bowl of vegetable soup.

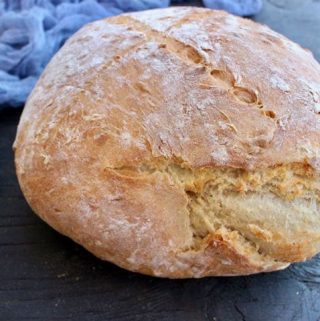
- A good homemade bread will have a soft, fluffy center with big holes and a crust that crackles in your hand with even a gentle squeeze. It’s very important to not overwork the dough if you are looking for airy holes in your bread like the ones in the photo above.
- Avoid the temptation to add more flour, simply dump the dough out of the bowl you mixed it in and shape into a loaf. No Kneading Allowed!
- I swear there’s nothing like the magic of a pizza stone, however you could also bake it inside a cast iron skillet or dutch oven if you really wanted to.

How to Serve and Eat Crusty Bread
- dip in olive oil with red chili flakes and fresh herbs.
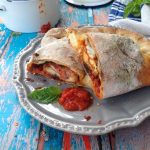
- alongside Pasta e Ceci, Zuppa Toscana, Roasted Pepper Tomato Soup + Frutti di Mare.
- make the ultimate Tomato Bruschetta!
- enjoy with Oven Roasted Tomatoes + vegan mozzarella.
- tear a crusty corner like nobody’s watching while still a little warm and spread a little butter on it.
- add 2 tablespoons of rosemary to the dough, 1/3 cup of sliced black olives or sprinkle the top with poppy seeds before baking.

What makes the bread crusty?
The secret is a bowl of water steaming under the pizza stone while the bread is baking. The steam makes a crusty loaf!
How to Store
Allow the loaf to cool off completely on a cooling rack on its side. Place it in a plastic bag and store on the kitchen counter at room temperature for a couple of days. I would not recommend freezing this kind of bread, instead if you find yourself with a stale chunk simply do as the Italian do: make a big pot of Ribollita or this Tuscan Pappa al Pomodoro soup.

Rustic Crusty Italian Bread Recipe Video
Rustic Italian Crusty Bread Recipe
Ingredients
- 3.25 cups all purpose flour + more for dusting
- 1 tsp sea salt
- 1.5 cups warm water
- 2 tsp instant yeast (or active dry yeast)
Instructions
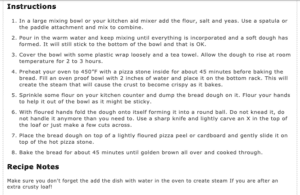
- In a large mixing bowl or your kitchen aid mixer add the flour, salt and yeast. Use a spatula or the paddle attachment and mix to combine well.3.25 cups all purpose flour, 2 tsp instant yeast, 1 tsp sea salt
- Pour in the warm water and keep mixing until everything is incorporated and a soft dough has formed. It will still stick to the bottom of the bowl and that is OK.1.5 cups warm water
- Cover the bowl with some plastic wrap loosely and a tea towel. Allow the dough to rise at room temperature for 2 to 3 hours until doubled in size.
- Sprinkle some flour on your kitchen counter and dump the bread dough on it. Flour your hands to help it out of the bowl as it will be sticky. Don't panic, this is normal.
- With floured hands fold the dough onto itself forming it into a round ball. Do not knead it, do not handle it anymore than you need to. Use a sharp knife and lightly carve an X in the top of the loaf or just make a few cuts across.
- Place the bread dough on top of a lightly floured pizza peel, cardboard or parchment paper and allow it to rest while your oven is heating up.
- Preheat your oven to 450”F with a pizza stone inside for about 45 minutes before baking the bread. Fill an oven proof bowl with 2 inches of water and place it on the bottom rack. This will create the steam that will cause the crust to become crispy as it bakes.
- Once your oven is hot sprinkle the pizza stone with some semolina flour or corn meal and carefully slide the bread loaf on top. Bake the bread for about 30 to 45 minutes until golden brown all over and cooked through.
- Transfer the bread to a cooling rack and allow to cool off completely before slicing into it. You can also let it cool inside the oven with the door slightly open.
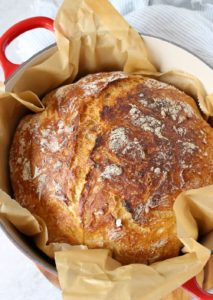
Dutch Oven Method
- Instead of a pizza stone preheat your oven with a dutch oven inside. Once hot, carefully place the bread loaf inside the dutch oven ideally using parchment paper for easy transfer. Cover with the lid and bake for 30 minutes. Remove lid and bake another 5 minutes until golden brown on top. Remove the bread from the dutch oven and transfer to a cooling rack or it won't stay crispy.
Original Large Loaf Recipe:
- Ingredients: 1 package instant dry yeast (1/4 oz)6.25 cups all purpose flour + more for dusting2 tsp sea salt3 cups warm water.
- Instructions: Follow the above instructions and bake at 450"F for 45 minutes.
Video
Notes
- Adaptation Jan. 2021 - because some people were having trouble working with a large loaf, I adapted the recipe to make a smaller loaf that is easier to handle and that will cook evenly even without a pizza stone. Those of you more experienced bakers with a pizza stone or a bread/ pizza oven feel free to double the recipe and make a huge rustic loaf out of this.
- Water dish - make sure you don't forget to add the dish with water in the oven to create steam If you are after an extra crusty loaf!
- Parchment paper - If using parchment paper make sure to check the box for the max temperature it can safely be used in.
- Keep it Crusty - make sure to allow your loaf to cool off completely on a high cooling rack so the moisture can escape through the bottom while the crust stays crispy. Alternatively allow the loaf to cool off on a rack inside the oven with door slightly open. (remove from dutch oven and discard parchment paper first).
Nutrition
You’ll Also Love:


Love this! Thank you!!
Also, just wanted to say an extra thanks for putting the amounts for each ingredient IN the instructions!! Every recipe post has me scrolling up and down between the main ingredient list and the instructions sp I can see how much to use but you put them together! SO much easier!! ::claps hands::
This makes me so happy! I’m so glad that little detail is so Useful in making a recipe ~ Florentina Xo’s
Great recipe. Could you sub bread flour to add even more gluten?
Yes you can use bread flour, report back if you try it! ~ Florentina
I made a half recipe, turned out Super! I will make this again. Great tips on making it crispie. Thank you!
I made this today to go along with soup. I was really lazy about it, forgot the yeast but threw it in after I set it to rise. I was expecting it to turn out terrible due to my error. It came out perfect! Best crusty loaf I have ever made. I will be making this on repeat.
My family Loves this bread and so easy to make thank you
Turned out great, though I couldn’t resist doing a stretch and pull halfway through. I’ve never made bread without my dutch oven so I was very excited to try this new technique. The crust seemed quite hard but softened beautifully after it had time to rest. Left it a little too long since it wasn’t browning which gave it a little bigger crust when I cut into it. Would there be a reason the crust didn’t brown? It only turned a slightly darker shade in the end. There was still a lot of water in my tray under the pizza stone, was it supposed to evaporate out completely mid-baking? Otherwise, taste was great. I didn’t get big bubbles since I didn’t let it rise as much, but I prefer it that way for butter. Definitely will try again 🙂
I bookmarked this recipe for this evening dinner but do you have a recipe for the herb infused olive oil dipping sauce.
Hi Shawn, I only used some extra virgin olive oil, a good pinch of red chili flakes + fresh Italian flat leaf parsley. Season with a pinch of sea salt flakes and let it infuse for a while while you make the bread. Enjoy ~ Florentina Xo’s
I’ve made this small loaf recipe twice and the dough is very loose. The only sharp it gets is when I put it in the Dutch oven. I use exactly 1.5 cups of water and3.25 cups of flour. It seems like it either too much water or not enough flour. In the end the bread is great.
Perfect recipe! I baked it in a Dutch oven and it is a beautiful loaf! Thank you!
I’ve been using this recipe for years now and it’s definitely my go to recipe for same day bread. It’s amazing! Crusty on the outside, soft on the inside with lots of holes. I use a dutch oven but have also had success using a pizza stone. I love adding garlic & onion powder to the dough, sometimes I put everything seasoning on top. Such a great, easy recipe!
This bread is incredible, my only problem is when I let the loaf sit it goes pretty flat, doesn’t hold its shape and ends up looking like a large cookie? Is my dough too soft, should I add more flour
Hi Sheryl, when you shape your dough make sure you form a tight loaf then place it on top pf a large piece of parchment paper and inside a mixing bowl. The bowl will prevent the dough from spreading on you and you can use the parchment paper as handles to transfer the bread to the oven. This way you don’t have to deal with re-shaping and tightening the loaf again a second time. Let me know if you try this method and if you find it useful ~ Florentina Xo’s
Best bread ever! I make it twice a week.
What are your thoughts about dividing the dough to make smaller loaves, or large roll-sized bread? How would you go about doing this?
Hi Kara, there is a recipe for a small loaf and a large loaf, the smaller loaf seems to be the easiest and full proof with most people because it’s way easier to handle and shape. I suppose you could do even smaller loaves and bake them on a baking sheet and start checking at the 25 minute mark for the perfect doneness when the crust is golden.
Apologies if this is a dumb question – I’ve made lots of bread in my dutch oven and also a bunch (albeit less so) on a baking sheet. If using the dutch oven here, should you still add the water for the steam or will it not matter because the dutch oven is covered? Also, do you find that you get better results with or without the dutch oven? Thanks!
Hi William, no need for the water dish if using the Dutch oven as the steam will be trapped inside the pot and deliver the crispy result. I think it is easier working with the Dutch oven if you are careful and comforbale handling a hot iron pot. Because I park my pizza stone in the oven and allayed preheat it with the oven I’m so used to having there and just transferring my bread straight to it. Let me know how it goes ~ Florentina
This is the best bread recipe I’ve found. Great crusty bread. Family ate whole loaf with dinner and requested I make 2 from now on.
I love this recipe. I have been baking this bread since January and it is delicious. I have a question about the flour measurements. I was initially using cups and have now switched to using metric measurements and a scale. When I convert 3.25 cups into grams, I get 390 grams of flour. The metric measurement in this recipe calls for 406.25 grams of flour, so I am not sure I am using the correct amount. Can you please clarify? Thanks so much!
Hi Jennifer, the conversion in the recipe is done automatically by the software calculator inside the recipe card.I strongly recommend doing your one calculations as well as there’s definitely room for error. Hope it all worked out ~ Florentina
I made this and it turned out perfect! So crusty and exactly as described in the directions! Love it and will be making again and again! Thank you for the recipe.
This looks fantastic! I have been looking for a good Italian bread recipe ever since my favorite Italian market closed, all took their wonderful bread with them.
Do you think that I could also make individual rolls with this dough? I would like to make muffaletta with them.
I have made hundreds of loaves of bread waiting for the perfect one. This is it. I’ve made this twice this week. It’s the best bread I’ve ever tasted. Thank you so much.
Hi Michele, I’m so happy the bread turned out amazing for you, thank you for reporting back, you made my weekend woohoo for good homemade bread ~ Florentina Xo’s
When Using a Dutch oven to make this bread do I still put water in a pan on the bottom rack?
Hi Nicky, no need for the water dish if using the Dutch oven as the steam gets trapped inside the pot making the bread crispy.
I’m making this bread for the first time, I added 1 1/2 tablespoons of Italian seasoning. When I added the 1 1/2 cups of warm water it didn’t come together as shown in your video. I had to add about 1/2 cup of more warm water to get it to stick together. Is that normal?
I live in AZ & it’s warm here.
I have literally never commented on a recipe before, but after countless attempts over the course of my life, today was the first time I have managed to successfully make the crispy, pillowy Italian loaf I’ve been dreaming of. I cannot thank you enough for sharing this recipe. I’m not exaggerating when I say I will remember this day for a long time to come! No more relying on iffy loaves from the food store, yay!
Hi Casey, thank you so much for reporting back, my heart is full after reading your comment, I am so happy you enjoyed the bread so much and it brought you so much joy ~ Florentina Xo’s
If I’m not able to bake the bread until the next day can I put the dough in the refrigerator overnight? If so would I shape loaf before or after putting in the refrigerator?
Yes you may just refrigerate it and shape before baking. Bring to room temperature for a couple of hours before planning to bake it and follow recipe card instructions. Let me know how that goes ~ Florentina
Thank you. Will let you know when I bake it tomorrow. I’ve made this bread a few times now and my family loves it
So I’ve made this recipe multiple times, and while it is simple and tastes great, but for the life of me I can NOT get it to be airy. It’s really dense and doesn’t have any of the holes like the pics. I’ve tried letting it rise from 2 hours and even for almost 24, I don’t overwork it…I’m stumped
Hey Rob, I suspect that after shaping your loaf there wasn’t enough time for the gluten to bounce back. I let the shaped loaf rest for a good 45 minutes to 1 hour while my pizza stone is heating up in the oven. This must be done in a cozy draft free area as well, if the temperature inside the home is cold this will take longer. You can form a tights loaf on a floured piece of parchment paper and place it inside a bowl to help keep its shape and prevent the dough from spreading on you then transfer straight to oven with the help pf the paper. Also I highly recommend the pull and fold method I use for my homemade spelt bread, I’d love to know if you give that one a try or the more recent olive bread.
Homemade Bread: https://46favorites-holiday.com/homemade-spelt-bread-recipe/%3C/a%3E%3Cbr /> Olive Bread: https://46favorites-holiday.com/olive-bread/%3C/a%3E%3C/p%3E
Make sure the yeast is fresh and of good quality. It should have a nice smell to it when activated. Should not smell sour. Stay away from instant yeast. Also, yeast can be stored in the freezer for a long time. Leaving it out in the warmth will kill it!
Hi! Do I still need to place the water in the bottom of the oven if I’m using a Dutch oven?
No you don’t, the steam will form inside the dutch oven.
Is the amount of yeast for the smaller loaf correct? It seems odd that you use 2 tsp in the small loaf but 2.25 tsp in the large loaf where everything is doubled.
If your instant yeast is good it’s going to work just fine it will be enough to make a larger loaf.