Best Whole Wheat Bread
This whole wheat bread recipe is rustic and crusty with a hearty but light and airy chewy crumb that isn’t dense nor dry. It’s made with a 50:50 ratio of whole wheat and high protein bread flours for the best crusty homemade loaf anyone can make. Easy, delicious, no knead better for your bread.
Servings 10 people
Calories 180kcal
Ingredients
- 2 cups whole wheat flour
- 2 cups bread flour
- 2 tsp instant yeast
- 1.5 tsp fine sea salt
- 2 cups warm water
- 1 Tbsp apple cider vinegar
- 2 Tbsp fresh rosemary (optional)
- sea salt flakes for garnish
Instructions
- In a large mixing bowl whisk together the flour, salt, yeast and rosemary if using. Pour in the water and vinegar and using a spatula combine everything until well mixed and a shaggy dough is formed.2 cups whole wheat flour, 2 cups bread flour, 2 tsp instant yeast, 1.5 tsp fine sea salt, 2 cups warm water, 2 Tbsp fresh rosemary, 1 Tbsp apple cider vinegar
- Cover the bowl with plastic wrap and a tea towel then place in a draft free area to rise for 3 hours or until doubled in size (you should see some bubbles forming on top of the dough). To develop more flavor you can allow the dough to sit overnight.
- Prepare a large piece of parchment (16 x 16 inch or so) and a medium size mixing bowl.
- Sprinkle some flour over your kitchen counter or marble pastry board and using the palm of your hand spread the four around for good coverage.
- Transfer the Dough. Remove the plastic wrap from the dough bowl and sprinkle some flour all around the sides of the dough. Flour your hands well then tilt the bowl on its side on the counter or pastry board and with your flour hand start guiding out the dough onto the floured surface. It will be somewhat sticky and it will deflate some but do not worry. (You could use a dough scraper for this step if you prefer, I just use my hands).
- Shape the Loaf. Sprinkle some more flour around the sides and top of the dough. Using the palm of your hands start gently tucking the dough under itself while spinning the loaf little by little as it tightens up. Continue tucking the dough until a tight dough ball has formed and you can easily scoop it up with the palms of your hands. (DO NOT PRESS or PUNCH THE DOUGH, the entire shaping process happens from the sides - PLEASE WATCH VIDEO TUTORIAL).
- Place the dough ball on the reserved clean piece of parchment paper then pick up the parchment paper by the sides and place the dough inside of the prepared clean bowl. This will help prevent the dough from spilling sideways as it rises and act as a proofing basket basically so you will have a beautiful shaped boule that is easy to transfer to the hot pot.
- Cover the dough again and give it another hour on the counter for the gluten strands to bounce back.
- After one hour has passed and your dough looks nice and plump again, preheat your oven to 475”F with a medium dutch oven inside with the lid on. Let the oven and pot preheat for 30 minutes. (If you don’t have a dutch oven you can use a large cast iron skillet without a lid).
- Using oven mitts very carefully remove the hot pot from the oven and place it on a heat proof surface like a thick wooden board. Remove the lid and safely place it on a heat proof area away from the reach of children or pets. SAFETY FIRST!
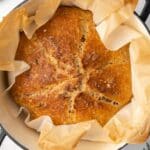
- Score + Bake the Bread. Using the sides of the parchment paper as handles transfer the loaf into the hot pot. Use a bread lame or sharp serrated knife and carve a few deep cuts in the top of the dough (this scoring process will basically tell the bread to rise upwards, otherwise it will burst at its weakest point as it bakes). Sprinkle with sea salt flakes if desired.sea salt flakes for garnish
- Carefully using the oven mitts again cover the pot with the hot lid and transfer it to the hot oven. Bake for 30 minutes with the lid on then carefully and safely remove the lid and continue baking the bread for another 15 minutes until a dark golden crust is formed. (NOTE WORTHY: For an extra crispy crust without a lid, you can do a light mist of water over the top of the dough and sprinkle with a pinch of sea salt flakes, or drop an ice cube in the bottom of the oven to create steam.)
- Put your oven mitts back on and carefully remove the pot from the oven and transfer to a cooling rack/ wooden board. Safely remove the bread from the hot pot making use of the parchment paper as handles or simply turning the pot upside down safely so the bread slides out. (The parchment paper will be brittle at the edges by now so be mindful to get a good grip on).
- Place the loaf of bread on a cooling rack (or wooden cutting board) on its side to cool off. This vertical position will help the extra steam escape and yield a nice crackling crispy crust.
- Make sure to let the loaf cool off for at least 15 minutes before slicing into it. This step will allow the center to finish cooking completely as the steam escapes.
Notes
- Crispy Crust Tip - Optional: after scoring the dough spray or splash the top with a little water to create steam and get an extra crispy crust + the salt flakes adhere better. I didn't do this here because I used a dutch oven with lid but it is recommended if you bake in a skillet or on a pizza stone without a lid. Alternatively you can just drop an ice cube in the bottom of the oven that will release steam as it melts for the same effect.
- Cooling the Bread - It's very important to allow the bread to cool off before slicing. The best way is by placing the hot loaf on a cooling rack (or wooden cutting board) on its side. This vertical position will help the extra steam escape and yield a nice crackling crispy crust. You can help stabilize the vertical position by placing a can of tomatoes behind it.
Nutrition
Serving: 1slice | Calories: 180kcal | Carbohydrates: 36g | Protein: 7g | Fat: 1g | Saturated Fat: 0.2g | Polyunsaturated Fat: 0.5g | Monounsaturated Fat: 0.2g | Sodium: 354mg | Potassium: 139mg | Fiber: 4g | Sugar: 0.2g | Vitamin A: 14IU | Vitamin C: 0.1mg | Calcium: 16mg | Iron: 1mg